Empress Miniatures – T90A conversion wip15 and Navy Combat Divers

A little more …

Small steps closer to finishing. Base weathering started and crews greenstuffed and base painted.

emp-t90-145-8-1100

And a bit of fun. As a change from basic black I decided to paint the Empress Navy Divers up as French Commandos from Operation Pork Pie. So officially they are French Commandos, disguised as Navy Seals, disguised as retro French Oceanographers, and all to try and fool the NZ Police Force (which they failed at by the way). Now I need a few 28mm Zodiacs ….

ns-012-850

ns-010-850

ns-014-850

ns-016-850

Empress Miniatures – M1A2 Abrams TUSK CROWS Ref pics and wip9

CROWS finished ….

The CROWS is pretty much finished and ready for painting I think. Very hard to photograph due to the bits being mostly white so I had to faff around with the colour to show some of the detail. The pics are still not the best and it does look somewhat better IRL …..

Q

emp-m1a2-040-1020

emp-m1a2-041-800

emp-m1a2-043-800

emp-m1a2-042-800

emp-m1a2-044-800

emp-m1a2-045-800

.
Some CROWS (XM153) reference pics from the interwebs (and included for discussion only). As you can see the are several detail differences (and more in the pics in my stash) in both gun shield and overall fitting between various installations. I took some liberties with my version partly because of scale and my ability to scratchbuild and partly as it’s for wargaming use, not for diorama or competition entry.

ref-crws-22

ref-crws-23

ref-crws-24-xm153-may2008

ref-crws-25

ref-crws-26

ref-crws-27

Empress Miniatures – M1A2 Abrams TUSK and M2A3 Bradley BUSK wip8

Bradley and CROWS wip ….

Made some mesh grills for the Bradley air-conditioning units from thin wire, superglue and lots of “bleep” words.

Then while the iron was hot I cranked out the base shape of the XM153 CROWS remote weapons station. Still got a fair bit of detailing to do on it (apart from tidying that is) such as adding the cartridge collection shopping baskets, various rivets, gun cradle mounting gubbins, remote firing adaptor, ammo feed chute – lid and latches and the rain covers for the optics.

The base shape is pretty repeatable now I have dimensions I’m happy with so I should be able to make a few more, some for the other Abrams and one “swappable” for the MATVs.

Q

emp-m2a3brad-125-1020

emp-m1a2-035-800

emp-m1a2-034-800

emp-m1a2-036-800

emp-m1a2-037-800

emp-m1a2-038-800

Empress Miniatures – T90A & M2A3 Bradley BUSK wip6

Shading and lining …..

Base lining and shading done on the T90A and Bradley. There are some details now to add as some were left off during the handling/painting process then it’s decals and final weathering.

The next lot of ERA blocks were shipped so late next week I can start on the Abrams and second Bradley.

And so what’s left to do on these guys ….

T90A
Periscopes for the TCs hatch
Covers for the Shitora system laser detectors
Aerial
Cross wind sensor
Unditching log (mandatory on all Russian AFVs)
Tow cables
IR lamp (on top of the LH turret top smoke dischargers)
Front mudguard springs
Crew
Left hand turret bin footrest
Side plate footloops
MG ammo belt
Replacement wheels (and maybe tracks)

Bradley
Armoured TC glass
Mesh over gunners primary sight
Crosswind sensor
Pioneer tools
Clamps for tow cable
Headrest for TC hatch
Mesh for air conditioning units
IFF panels (maybe as I haven’t seen any fitted on BUSK Bradleys)
Crew
Towing shackles

Q

emp-t90-090-1020

emp-t90-091-1020

emp-m2a3brad-120-1020

emp-m2a3brad-121-1020

era-blocks-v3-600

Empress Miniatures – M2A3 Bradley BUSK wip5

Base camo on the Bradley ….

I know, I know …. I said the BMPs would be the last of the Modern vehicles for a bit however I couldn’t stop without completing the base paint on the Bradley. So the NATO camo (or my version of it) is laid on and ready to weather/tone down ….

Q

emp-m2a3brad-n-abrams-110-1250

emp-m2a3brad-112-1020

emp-m2a3brad-116-1020

emp-m2a3brad-114-1020

Empress Miniatures – Modern Vehicles T90A, M2A3 Bradley, BMP3 wips

Current vehicle batch primed …..

Well decided that these guys are ready for paint and so gave them an enamel primer undercoat. Pretty pleased with how much more “tank” like they look with a uniform base paint on. Next step is to decide on the correct shade and then lay on the basecoats with acrylic. The primer has shown up a few areas that need some tidying up and smoothing of some of the file marks so after fixing those it’s painting action …. at least until my next lot of parts shows up 🙂

Q

.

Group goodness

emp-grp-050-1400

M2A3 Bradley …

emp-m2a3brad-093-1020

emp-m2a3brad-095-1020

emp-m2a3brad-092-1020

emp-m2a3brad-096-2-1020

emp-m2a3brad-094-1020

BMP3s …

emp-bmp3-040-1020

T90A …

emp-t90-070-1020

emp-t90-071-1020

emp-t90-073-1020

And a couple of on table shots …..

emp-grp-052-1200

emp-grp-054-1200

Empress Miniatures – BMP3 wip

BMP3 progress ….

Fortunately not much to do to these boys compared to the Bradley and T90 although I may add some side ERA to the third vehicle when that arrives later to make the numbers up to a platoon. Add ons are just really cosmetic goodness, front MG brush guards, a few grab handles, wiring for the turret laser and searchlight and thickening up the hatches which are quite a bit more prominent on the real vehicle.

Q

emp bmp3 021-2 1020

emp bmp3 025 1020

emp bmp3 023 1020

.
And some final detailing on the T90 and Bradley which are now pretty much ready to undercoat. The remaining final detailing will be added after most of the painting is completed …

emp grp 040 1400

emp m2a3brad 080 800

emp t90 061 900

Empress Miniatures – M2A3 Bradley BUSKIII conversion wip 2

Empress Bradley update/conversion …

Just a small update showing off the new 3D printed air-con units (courtesy of Jason) and a little more detailing (various lift handles and the re-positioned rear M2 variant periscopes). Only really the fans to install plus a couple of lift points I missed then it’s ready for paint.

Q

emp m2a3brad 072 1020

emp m2a3brad 071 1020

emp m2a3brad 073 1020

.
And managed to delete a the post before this while posting the above above update …. because of “reasons” … ie incompetence.
So here’s most of it reposted, hopefully.

Bradley M2A3 BuskIII wargaming conversion using the Empress (ex Imprint) Bradley M3A2 ODS as a base. Settled on using Laser cut acrylic for the ERA blocks (6mm) so as to get them more repeatable and consistent and pretty pleased with how the worked out to be honest.

emp pon 003 1020

emp pon 006 1020

emp pon 008 1020

emp pon 009 1020

emp m2a3brad 052 1020

emp m2a3brad 056 1020

emp m2a3brad 050 1020

emp m2a3brad 054 1020

.
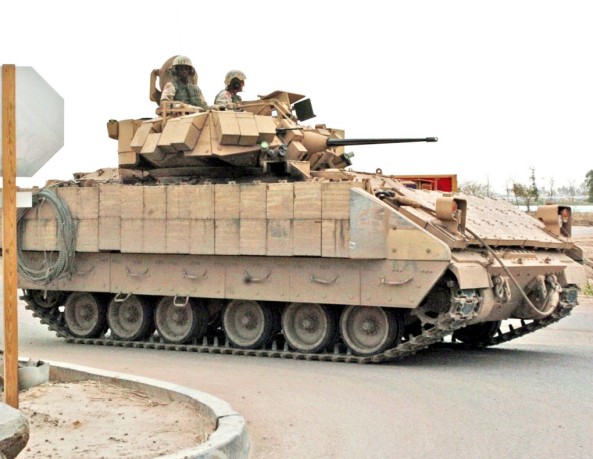
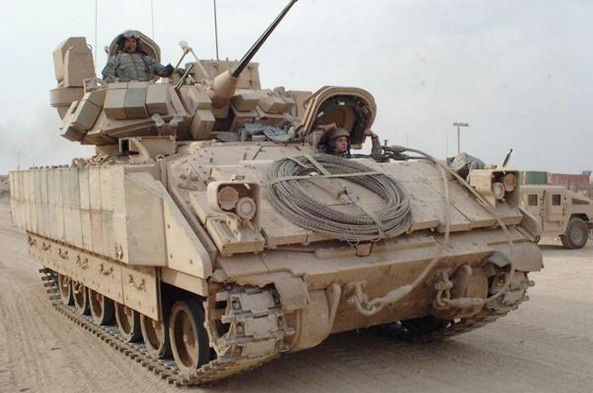
And some useful Bradley ref pics of various M2 and M3 A2s and 3s with BUSK kits. Also included are a couple of non Busk tracks (one a nice BFIST) in Nato with Tan accessories . Pics are from open web sources and included for discussion purposes only.

brd ref211

brd ref21

Bradley Fighting Vehicle drives off range. CONTINGENCY OPERATING BASE SPEICHER, Iraq – Infantrymen from 1st Battalion, 5th Cavalry Regiment, 2nd Advise and Assist Brigade, 1st Cavalry Division, drive their M2A3 Bradley Fighting Vehicle off of Memorial Range after zeroing the 25mm main gun and M240B machine gun during a live fire exercise in support of Operation New Dawn near Contingency Operating Base Speicher, Iraq, July 29, 2011. (U.S. Army photo by Sgt. Quentin Johnson, 2nd AAB PAO, 1st Cav. Div., USD – N)

Bradley Fighting Vehicle drives off range.
CONTINGENCY OPERATING BASE SPEICHER, Iraq – Infantrymen from 1st Battalion, 5th Cavalry Regiment, 2nd Advise and Assist Brigade, 1st Cavalry Division, drive their M2A3 Bradley Fighting Vehicle off of Memorial Range after zeroing the 25mm main gun and M240B machine gun during a live fire exercise in support of Operation New Dawn near Contingency Operating Base Speicher, Iraq, July 29, 2011.
(U.S. Army photo by Sgt. Quentin Johnson, 2nd AAB PAO, 1st Cav. Div., USD – N)

brd ref23

brd ref22

brd ref24

Iraqi Freedom

Iraqi Freedom

brd ref28

brd ref29

brd ref30

And intermediate detailing progress ….

emp m2a3brad 060 1020

emp m2a3brad 064 1020

emp m2a3brad 063 1020

emp m2a3brad 062 1020

Empress Miniatures – M1A2 SEP TUSK conversion wip2

A little carpentry ….

Hunting for something to make the ERA (explosive reactive armour) blocks from proved tricky for a while. Sounds easy doesn’t it, after all it’s just some plastic blocks/strips. However none of the plastic sheet on hand including some acrylic was thick enough and would prove difficult to cut accurately anyway.

After much searching I went alternative and looked at the wood strip supply. I finally found something that looked close and after some measurements decided it looked almost perfect to get both the required hull length and side rail depth. I cut a test piece and decided it worked well enough to crack on with.

The wood strip is bass wood used in picture framing (1/4″ x 3/16″) and should be readily available at hardware outlets, which is handy as I’ll need more including a thicker depth for the Bradley tiles. Ideally this should be done by creating a strip of tiles with it’s mounting backing plates and then casting it in resin for the multiple copies required. I may …. still try this if I can fund some resin but as finding that amount of spare cash is unlikely I’ll probably have to carry on manually.

Either way the strip was marked to the length required for the double stacked block (13mm as the Abrams side skirt is 14mm), cut to size with the diamond saw and then cleaned up by a gentle sanding. A half way line to simulate the 2 separate blocks was marked and then an impression cut into the block with the saw. I painted it with some Vallejo Sand to seal it and check that the grain didn’t show. Being a denser wood required for picture framing all was good as so the test block was ticked off.

The Abrams has 32x ARAT XM19 ERA Blocks (31 plus a spacer block) fitted to mounting rails attached to the side skirts and so I cut 16 (to be cut to simulate doubles) blocks. I’m not sure yet how detailed the backing mounts will be yet, there’s a line to be drawn in the detail somewhere ….. 🙂

emp m1a2 017 era1 1020

emp m1a2 019 era2 900

ABRAMs TUSK ERA – ARAT-1 XM19 and ARAT-2 XM32

The Abrams can be currently retrofitted with ERA bocks as part of the TUSK (Tank Urban Survivability Kit) upgrade. Amongst other upgrades which are modular and it is possible to see some tanks with mixed equipment fits, the ERA system is fitted to mounting rails attached to the tanks side rails. This can be done with a field install kit and by troops on deployment.

The block part of the system is called ARAT-1 (Abrams Reactive Armour Tile) and the blocks are designated XM-19. The mounting package also includes brush guards fitted to the front and rear side rails. Note the front side rail on each side of the vehicle is replaced by a specialised and thinner plate although I won’t be modelling this.

To create a TUSKII level package, ARAT-2 curved tiles, XM-32, are further mounted to the side XM-19 blocks and to the sides of the turret.

REF Pics included from web sources and for discussion only. I believe some are from the excellent looking Tankograd publication M1A2 SEPv2 which is highly recommended as a modelling resource.

Abrams desex 14

Tusk 1 and 2 mix

XM32 ARAT2 22

M32 tiles on M19 Blocks v2

arat1 011 900

arat2 021 900

arat maint 12 900

tusk1-intsalltion-kit

And a couple of general Abrams ref pics from exercises held in Eastern Europe and showing the look I’m hoping to achieve as well as the CROWs remote weapons systems fitted to the turret roof.

Abrams euroex 22

Abrams euroex 31

M26E4 Super Pershing – Tamiya conversion for Bolt Action

Super Pershing finished …

Got a few finished pics to post over the next day or so and here’s the first of them – the 1/48th Super Pershing Tamiya conversion. Pretty happy with how it finished up, damn difficult to photograph though with that bloody great gun! 🙂

And a bit of spiel, Tamiya base kit, Blackdog stowage, scratch built gun and armour package. The stowage was nestled down onto the back deck (a pet hate is “floating” resin stowage) using the Dremel and a layer of greeenstuff. The amour plate was guesstimated using ref pics of both the real thing and other models and the gun was made using a piece of sprue, trimmed to length and with a tapered breech end piece and the original Tamiya muzzle brake at the business end. Finished as usual mostly with GW acrylics over an enamel primer base. The big star on the turret is handpainted and the rest of the markings (ficticous) are from the Tamiya kit.

It’s now on it’s way to it’s new home and should make an appearance in a tournament game of Bolt Action over Easter weekend.

Q

SP cvr 000  1600

SP 148 095  1500 2

SP 148 091  1500 2

SP 148 088  1600 2

SP 148 093  1600 2

SP 148 092  1600 2

SP 148 089  1500 2

SP 148 092  1020 cu 2

SP 148 089  900cu2

SP 148 094  1500 2

Tamiya 1/48th Super Pershing conversion – triple project wip6

Base camouflage on …

The “Beast” has it’s black camouflage is now on and she’s ready for the fun stuff – lining, streaking and weathering. After the tedious job of painting the tracks though …. oh my aching brushes 🙂

Q

48tam spershing 105 wdp 1300

48tam spershing 108 wdp 1350

48tam spershing 106 wdp 1020

48tam spershing 107cu wdp 1100

Empress Miniatures Delta Force 28mm – FIRETEAM

Delta Force ….

The start of our Special Forces venture which will hopefully include some new units to add to this one as well as eventually USN Devgru (SEALs), SAS and FSB/Spetnaz.

And some background;

The 1st Special Forces Operational Detachment-Delta (1st SFOD-D), popularly known as Delta Force, is the U.S. Army special operations unit tasked with such missions as hostage rescue and counterterrorism, direct action and reconnaissance against high-value targets. It’s the US Army counterpart to the possibly better known United States Naval Special Warfare Development Group (or DEVGRU), also often referred to as SEAL Team Six.

Formed in 1977 under command of an ex Green Beret Officer Charlie Beckwith, it’s exact composition and strength is classified although some known sections include;

A Squadron (Assault)
B Squadron (Assault)
C Squadron (Assault)
D Squadron (Assault)
E Squadron (Aviation)
G Squadron (Advanced force operations, Reconnaissance and Surveillance)
Combat Support Troop (Contains WMD Experts, Breachers, and other specialists)

Q

emp US8 Delta  1250 v2

emp US8 Delta  inf 1100cu v2

emp US8 1000 v2

emp US8 t2 1000 v2

And some refs (from open web sources and included for discussion purposes only)

delta 554

delta 556

USarmy Delta  Tom Spooner rtd

delta 559

delta 553

hqdefault

Tamiya 1/48th Pershing – Super Pershing triple project wip5

Primer paint on ….

Added some Blackdog stowage and sprayed an enamel primer coat (Tamyia OD rattlecan). The stowage needed some work to get it to fit and I added green stuff “tarps” as a base to each piece to get them to sit down with the usual problem of rigid resin stowage.

Next steps are to mix up my preferred shade of acrylic OD (GW Catachen Green and Vallejo OD) and brush on the base paint ….

Q

48tam spershing 080 1150

48tam spershing 081 1150

48tam spershing 082 1150

48tam spershing 083 1150

Tamiya 1/48th Pershing – Super Pershing triple project wip4

Spaced armour completed ….

Finished the additional spaced armour package today plus most of the other Tamiya details. Top hatch and aerial mounts will go on after base paint has been laid on.

Not much to say about the process, I used a few basic tools, tech drawing dividers, steel ruler and the always efficient eyeball. I basically guesstimated the sizes and dimensions using photo refs on the pc, my 20mm conversion and the Hobby Boss 1/35th kit. The hydraulic balance cylinders have been fudged a bit as at the end of the day this is for gaming not competition (like I’ve ever done a competition model lol).

Enjoy

Q

48tam spershing 065 FRA 1000

48tam spershing 068  1250

48tam spershing 069  1250

48tam spershing 070  1250

48tam spershing 071  1250