Empress Miniatures – M2A3 Bradley BUSKIII conversion wip 2

Empress Bradley update/conversion …

Just a small update showing off the new 3D printed air-con units (courtesy of Jason) and a little more detailing (various lift handles and the re-positioned rear M2 variant periscopes). Only really the fans to install plus a couple of lift points I missed then it’s ready for paint.

Q

emp m2a3brad 072 1020

emp m2a3brad 071 1020

emp m2a3brad 073 1020

.
And managed to delete a the post before this while posting the above above update …. because of “reasons” … ie incompetence.
So here’s most of it reposted, hopefully.

Bradley M2A3 BuskIII wargaming conversion using the Empress (ex Imprint) Bradley M3A2 ODS as a base. Settled on using Laser cut acrylic for the ERA blocks (6mm) so as to get them more repeatable and consistent and pretty pleased with how the worked out to be honest.

emp pon 003 1020

emp pon 006 1020

emp pon 008 1020

emp pon 009 1020

emp m2a3brad 052 1020

emp m2a3brad 056 1020

emp m2a3brad 050 1020

emp m2a3brad 054 1020

.
And some useful Bradley ref pics of various M2 and M3 A2s and 3s with BUSK kits. Also included are a couple of non Busk tracks (one a nice BFIST) in Nato with Tan accessories . Pics are from open web sources and included for discussion purposes only.

brd ref211

brd ref21

Bradley Fighting Vehicle drives off range. CONTINGENCY OPERATING BASE SPEICHER, Iraq – Infantrymen from 1st Battalion, 5th Cavalry Regiment, 2nd Advise and Assist Brigade, 1st Cavalry Division, drive their M2A3 Bradley Fighting Vehicle off of Memorial Range after zeroing the 25mm main gun and M240B machine gun during a live fire exercise in support of Operation New Dawn near Contingency Operating Base Speicher, Iraq, July 29, 2011. (U.S. Army photo by Sgt. Quentin Johnson, 2nd AAB PAO, 1st Cav. Div., USD – N)

Bradley Fighting Vehicle drives off range.
CONTINGENCY OPERATING BASE SPEICHER, Iraq – Infantrymen from 1st Battalion, 5th Cavalry Regiment, 2nd Advise and Assist Brigade, 1st Cavalry Division, drive their M2A3 Bradley Fighting Vehicle off of Memorial Range after zeroing the 25mm main gun and M240B machine gun during a live fire exercise in support of Operation New Dawn near Contingency Operating Base Speicher, Iraq, July 29, 2011.
(U.S. Army photo by Sgt. Quentin Johnson, 2nd AAB PAO, 1st Cav. Div., USD – N)

brd ref23

brd ref22

brd ref24

Iraqi Freedom

Iraqi Freedom

brd ref28

brd ref29

brd ref30

And intermediate detailing progress ….

emp m2a3brad 060 1020

emp m2a3brad 064 1020

emp m2a3brad 063 1020

emp m2a3brad 062 1020

Empress Miniatures – Vehicle conversion project

Assembly wips ….

Decided to post all the various wips from the project into one series but give them each a separate “feature” once final painting is finished.

T90A Welded Turret conversion

First step was to prepare some scale plans for the base T90, the T90A welded turret and the prototype T90MS Tagil. I reduced some reference plans until hull width matched a scale 1/50th. The Empress T90 was within a mm or so width wise but a little short in overall length. Not much I can do about that but I’m planning to fit extra fuel tanks on the rear so the length wont be an issue, not that it is, just covering it off from a completeness point of view.

Tracks

The tracks fit inside the upper hull track guard and against a chamfered edge and with a lip to provide fore/aft location. I had to file off the upper outer edge to get them to sit down properly. I also relieved the inside of the front idlers to simulate the bearing housing because the wheel sits so far forward of the front plate and is visible.

Turret

The first step was to remove the turret bins, ERA blocks and fittings using a razor saw. I then ground the turret into the basic welded shape using a bench grinder, the dremel and files. Next the shape will be tuned then flat plates made from plasticard attached. Any gaps will be filled and the whole thing sanded and filed into the final profile. Last steps will be to add back in all the removed details …..

emp t90 0011 1100 conversion planning

emp t90 0015 1100 turret conv

emp t90 0019 1100 turret conv

emp t90 0020 1100 turret conv

emp t90 0021 1100 track fitting

emp t90 0023 1100 front idler

Abrams TUSK conversion

The only work so far was to grind out the tank commanders hatch so a crewman can be fitted to one of the tanks.

emp m1a2 015 1100 hatch

Bradley BUSK conversion

One vehicle is going to have the twin air-conditioning units fitted and so I removed the rear stowage bins with the trusty razor saw. Both vehicles had their front headlights removed so that the front BUSK ERA plate can be fitted. The headlights will be put back in place on top of the new block. I also started grinding down the inside of the hull turret ring. I’m planning to build up the base of the turret so that it fits better/more securely. In the past I’ve just drilled and pinned the turret on but as the ring is so shallow it was difficult to seat properly. I’ll probably grind this down about the same distance again and if the experiment works all vehicles except the BMPs will get the same treatment.

emp brad 016 1100 hull fittings

cheers
Q

Kubelwagen and crew – 28mm from Wargames Foundry

Old school goodness ….

28mm Kubelwagen and crew by Wargames Foundry. Just some old school 28mm painting. The Foundry Kubel is a nice little model if a touch on the small side, especially the wheels. However the crew are nice and the whole package has scrubbed up pretty well ….

As usual everything’s brushed mostly with GW acrylics. The colours used on the crews tunics and officers greatcoat however include Vallejo Green Grey (Model Colour 971) which has just a touch of Olive Green added. The pants are GW Space Wolves Grey (old hexagonal). When painting figs I often blend by drybrushing. First I lay in the base colours, then line and shade and next drybrush to blend. That is followed by some highlighting and more manual blending where required.

Q

The Kubel …..

Foundry Kubel 011

Foundry Kubel 030

Foundry Kubel 035

Foundry Kubel 042

The Crew …..

Foundry Kubel 051

Foundry Kubel 052

Foundry Kubel 060 1000

The Boyz and their ride …..

Foundry Kubel 61

Foundry Kubel 62

Foundry Kubel 64

Foundry Kubel 65

A Bridge Too Far – 28mm Bolt Action project wip17

On the home stretch ….

I’ve been adding final details and they’re almost finished now. A few more decals to add and the last of the weathering, mostly pigments on wheels and tracks, and then they’ll be complete.

Q

.
bft 092-3 grp 1450

bft 090 grp 1450-5

A Bridge Too Far – 28mm Bolt Action project wip13

Getting there ……

Some progress from the last few days, a bunch of stuff is almost at the final weathering stage. Not much to say, shaded mostly with oils (using some WnN oils that are about due for replacement being about 30years old) and the usual GW acrylics.

Also managed to get some decals on – firstly splashed some Humbrol satin varnish onto the areas where the decals were going. Then wet the area with some Microscale Micro-sol and poked them into place. To be fair the Warlord decals are surprisingly good quality with a thin backing and almost no silvering. After patting them dry they got a coat of Microscale Micro-set ….

After decaling I tried out some new matt varnish on the M13/40 and the two Warlord 251/1Cs – rattlecan Tamiya Flat Clear. Pretty pleased with the result to be honest, I’d say a little more matt and slightly better coverage (dulling of the satin varnished decal areas) than the Dullcoat I normally use.

Enough faffing about …. pics to enjoy ….

Q

bft - 251 116-3 grp 1250

bft - 251 115 grp 1020

bft - luchs 100-2 1020

bft - luchs 102-2 1020

bft - luchs 101-2 1020

bft - 250 110 grp 1400

bft - 250 111 grp 1400

m13-40 - 060 grp  900

A Bridge Too Far – 28mm Bolt Action project wip10

Pin washes all finished ….

Lined the Opel Flak and cargo, the last 250/1 and put a filter over the 251/7 to match it to the shades of the others as originally it was going to get a late war factory 3-colour finish.

All vehicles are now pin washed and basically ready for finishing work, the usual stuff being shading, chipping, streaking, markings and pigments. Stowage will be added and detailing finished ….. they’re on the home stretch.

Q

bft - 087 grp 1350

And a bonus pic of the next group, again for use mainly with Bolt Action rules. These are to be finished along with the Tamiya 1/48th Super Pershing conversion.

Britz - 025   1100

A Bridge Too Far – Warlord Games, Blitzkrieg Miniatures and JTFM 28mm Bolt Action project wip5

Warlord Grabners Humber A/C and 251/8 . . . .

Finally managed to get a little more progress done on the Bridge to Far project getting the 251/8 Ambulance and Grabners Humber Armoured Car to the final stages. QC, final detailing, markings and pigments to go ….

Q

.
bft - 071 900

bft - 072 900

bft - 055 900

bft - 056 900

bft - 053 900

bft - 052 900

bft - 064 900

bft - 65 900

bft - 060 900

bft - 061 900

bft - 051

A Bridge Too Far – Warlord Games, Blitzkrieg Miniatures and JTFM 28mm Bolt Action project wip4

Assembly finished . . .

I also managed a little more progress on the Bolt Action project. It’s surprising sometimes what you can get done with a couple of 2 or 3 hour sessions, mostly it feels like nothing it getting done then all of a sudden you can step back and “see” a block of progress. This was a little like that. being sick and sitting at the modelling desk felt a little like a chore but it is nice to actually see some forward progress being made for the effort and time . . .

Anyway enough modelling philosophy, the Hohenstaufen Recce Abt, well the Bolt Action version at least, is finally assembled and primed with most of the detailing completed also. There’s still small stuff to be added after most of the painting of course (there always is lol) but it’s looking reasonably impressive in the group shot I think.

cheers

Q


bft - 031 1500 bft - 041 1250 bft - 043 1024 bft - 044 1024 bft - 042 1024 bft - 045 1024


A Bridge Too Far – Warlord Games, Blitzkrieg Miniatures and JTFM 28mm Bolt Action project wip3

Warlord Opel Blitz and Flak …..

Finished the base assembly of the Warlord Opel Blitz and 2cm Flakvierling 38 conversion. Pretty basic stuff, to fit the Flakvierling in place of the single 2cm I built up a standoff plate or spacer out of some plasticard. Then I drilled the main guns and body so that I could pin the guns for elevation and fit a screw fastener to allow traverse.

I drilled and pinned the headlights of both Opels as they’re fragile and exposed to handling and assembled the cab of the troop carrier. This was another exercise in filing and trimming as there’s a bunch of little misalignments conspiring against an easy fit. I left the top of the cab separate so I can paint the inside and fit the cabin glass before closing it up.

There’s a couple of small things to add after base painting but they’re basically done and waiting paint …..

Q

bft - 021 1024

bft - 022 1024

bft - 023 1024

bft - 024 1024

bft - 025 1024

bft - 026 1024

bft - 027 1024

A Bridge Too Far – Warlord Games, Blitzkrieg Miniatures and JTFM 28mm Bolt Action project wip2

Yes, kits . . . . .

As mentioned the kits are mostly Warlord primarily because of availability of subjects, some Blitzkieg because we wanted to compare the quality and a few JTFM which I had lying around. In addition there are various stowage packs from Warlord and JTFM and decals from Warlord.

Warlord Games
Opel Blitz with open canopy
Opel Blitz and 2cm Flak
SdKfz 251/1C SPW (Plastic kit) x2
SdKfz 251/8 Ambulance
SdKfz 250/7 Neu 81mm Mortar
SdKfz 250/8 Neu 7.5cm SPG Stummel
PzKpfw II Ausf.L Luchs Recce
Flakvierling 38 20mm
Schwimmwagen
SdKfz 222 Armoured Car
Grabners Humber Armoured Car

BlitKrieg Miniatures
SdKfz 231 2.0cm 8rad Armoured Car
SdKfz 250/1 Neu SPW x2

JTFM
SdKfz 251/7 Engineer SPW

I didn’t take “sprue” or contents pics of everything, shame on me I know, but did for the Plastic 251/1Cs out of interest as I hadn’t made a Warlord plastic kit before.

btf - 002

And this was the second batch of received vehicles.

btf - 003

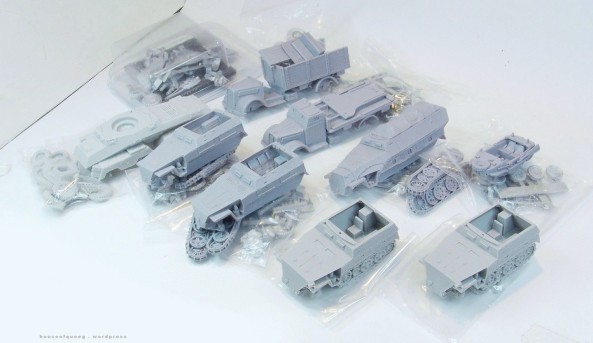
I tackled assembly as the kits arrived, helped by the fact they came in distinct groups. The first batch was the Luchs, 222, x2 251/Cs and Grabners Humber. Just a note, I’ve made comments on the assembly and details of the kits. Don’t take offence, these are personal comments and please remember that at the end of the day they will look great once painted … and that is the most important thing.

Warlord 251/1C Plastic kits. The plastic 251s were pretty basic and easy to assemble. I made a few small mods to give them some character and they’ll get some final detailing (aerials, stowage, width indicators) once basic painting has been done.

Warlord Luchs. Like the plastic 251s the Luchs assembles easily with excellent and sharply moulded detailing. There were no issues except a bit of grinding with the dremel to thin out the track guards and searching the spares box for a replacement 2cm main gun as the kit one was a string of white metal and let down the rest of the kit. I added some details out of the spares box using left over 1/48 Tamiya tank tools and will add a few more after the camo has been painted.

Warlord Grabners Humber. Reasonable assembly but the first kit that looked “off” to both my eye and when comparing it to reference pictures (the turret in particular is terrible in shape and dimension). I don’t mind “fast build” or less detailed kits but do get annoyed when Masters at this size are made without some care and attention. To be completely honest it’s been my personal issue with 1/56th gaming resin kits for many years and the reason I favour 1/48th kits and haven’t delved into 28mm much. But enough of the personal soapbox, I added guards for the front lights, towing hooks and a stowage box to the right hand side and as usual will add a few more items after basic painting.

Warlord SdKfz222 A/C. I think this is one of their older kits and I added a lot of extra detail to try and break up the look. The wheels are terribly undersized and are the worst feature of the kit making it look oddly proportioned. I would have replaced them if I’d had anything in the spares box that was the right size. The turret screen are moulded in solid white metal which is understandable but have no texture to the inside face if you wish to have them open like I did. Again personally I would have replaced these with PE 1/48th upgrade parts as they still would have been strong enough for handling on the table and look far better.

btf - 005

btf - 004

btf - 006

btf - 009  1250

And the whole group base coated using a Tamiya rattlecan (TS-3 Desert Yellow)

btf - 011  1250

My Milicast Grabner Humber competed many many years ago …. pretty much how I’m hoping this one will look.

Grabner Humber11

Grabner Humber12

Blitkrieg SdKfz 231 8rad. Only basic assembly completed so far but a very nicely moulded kit. The wheels are very nicely moulded with a sharply detailed (if fantasy) tread and wheel hub pattern that probably won’t be noticed under paint and weathering. They do have very large resin pour plugs however and there’s no way to remove without destroying some of the nicely moulded tread. It would have made much more sense to angle these further towards the rear side of the tire/wheel so that the inevitable removal damage wouldn’t be seen when assembled. Again I’ll try and find something to replace the main 2cm gun with. The kit supplied one is nicely moulded but very thin and fragile.

The pic below shows it with a Bandai 1/48th 232 and JTFM 1/56th 234/2 Puma for comparison.

btf - 014

Warlord Opel Blitz and Opel Blitz AA. Pretty basic assembly and good detail. Both chassis which include the front section of the cab were badly warped however. I soaked them in warm water, straightened them and then set the shape by plunging into iced water. After that though I have noticed that they have taken a slight bend again after warming back up to room temperature. I’ll straighten them once more before assembling further and if they warp again I’ll glue stiffeners to the undersides. There were large resin pour plugs to be removed on the front bumper, take care when removing them. I ground mine away with a dremel but I know not everyone has access to one ….

Warlord SdKfz251/8 D Amubulance. A kit that at first glance looks very nicely detailed and should have been the simplest and quickest to assemble. I wish I had taken more pictures of this one however as I spent about 2 hours grinding at it with a Dremel to get the tracks (oversized) to fit and sit correctly. The hull moulding/master suffers from either mould shift or poor design. Some of the side plates are noticeably splayed out and the underneath is a mystery. One side appears to be aligned horizontally completely differently to the other and is longer/bigger in places than the other side making track fit . . . unusual to say the least. If assembled as is the vehicle sits way too high and the tracks too far back. I also had no choice but to incline the front wheel/axel assembly forward so that the wheels sat correctly. As supplied they sit too far back and too tall, adding to the odd look. I hazard a guess that the problem is in the length of the rear hull and when I get time I’ll run a size check against some scale drawings. So after much grinding the underneath to square things up I’m reasonably happy with how it sits. Although the track drive sprocket looks to be 1/48th in size and catches my eye every time . . .

My easy method of aligning wheels and axels. I like to assemble them before attaching to the vehicle as it makes getting everything square and aligned much easier.

btf - 015

btf - 016

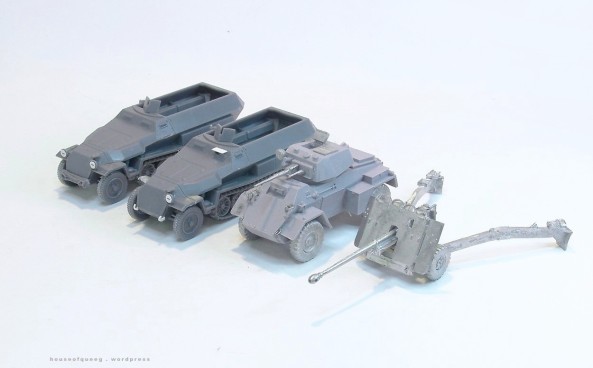
A comparison of the three 1/56th halftracks. While the “C” is more of a comparison of Warlord resin vrs Warlord new plastic, it is still interesting to see all three together. The Warlord C is nice and appears good in profile, recommended. Comparing the 2 251/Ds I much prefer the JTFM version. It looks like the profile drawings even if the detail is a little “dated”. As for the Warlord resin 251/D, I’d personally use alternative manufacturers until Warlord either change the shape or produce a better one in plastic. Again just my views coming from the perspective of what looks correct . . .

156th 251 comparison 500

UPDATE Ok I dug out a 1/35th plan and overlaid the Warlord 251. Nothing technical, just to see where the differences were. As suspected the rear hull is very short, tracks/road wheels are oversized (although not as bad as I thought, they look worse because of the short hull), nose profile is wrong and the front wheels too small. All that said it should still look good when painted so stay tuned . . .

Warlord scale comparison v1 jpg

A completed 20mm Cromwell SdKfz251/8 Ambulance and the finish I’ll be using for the Warlord one.

G41 Sdkfz 2518 AMBULANCE  p02

G41 Sdkfz 2518 AMBULANCE  p04

Q

Warlord Games 1/56th Cromwell MkIV

Recently finished wargaming vehicle, a 1/56th resin and white metal Cromwell MkIV from Warlord Games.

Pretty straightforward build (theres only 14 parts) although I did have to dremel some material out from inside the tracks guards. It was way too high as supplied so removed material to get the tracks up inside the guards and it sitting closer to the height show in photos and profile drawings.

It’s brush painted as usual, undercoat being Humbrol green and the finshing coats and weathering done with GW acrylics.
I hand painted the allied stars but robbed a Tamiya Cromwell for the tac codes and unit markings. I do wish wargaming kits would come with decals included ……. worthwile paying a few extra bucks for as you have to source them from elsewhere and pay anyway!

Q

WG Crowmell 000 1100

Wg cr210 1000
Wg cr212 1000
Wg cr213 1000
Wg cr214 1000
Wg cr215 1000

And a few wips ………..

WG Cromwell w010
WG Cromwell w040
WG Cromwell w060
WG Cromwell w070